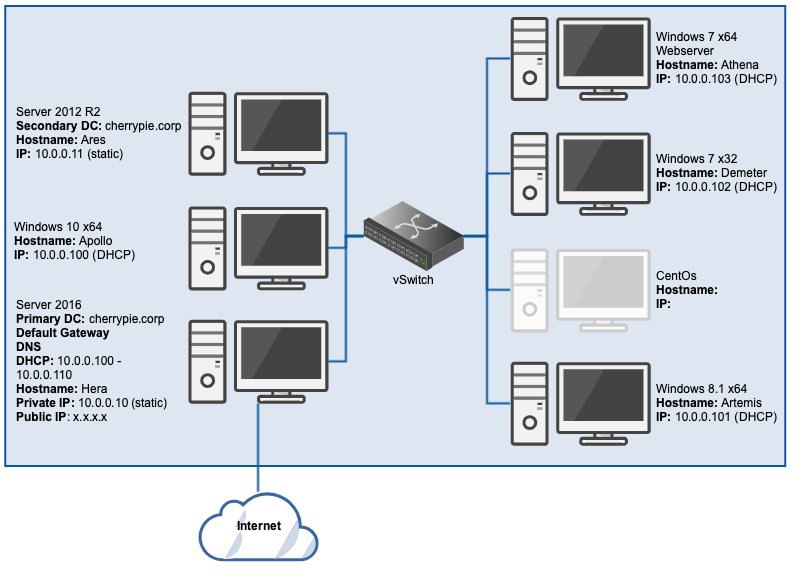
By this the fifth instalment of the ‘build your own lab’ series, the lab already resembles this network diagram (or should, anyway):

As the title suggests, it’s time to install the Windows 7 workstation(s).
Workstation Configuration
During the installation, Windows asks for a user name and a Computer Name. Enter these to save a step later in the process:

You can also configure Windows updates and the timezone during the installation if you like.
Once the OS is installed, the VM, as with the other workstations already added, will be automatically assigned the next available IP in the DHCP scope, 10.0.0.102. Check this in the Network and Sharing Centre:

You guessed it: don’t forget to disable the public (Internet) facing NIC. As seen below, the VM should be able to access the primary and secondary DCs, and the Internet:

Domain Configuration
Open the Start Menu, right-click Computer, then click Properties:

In the resulting window, click Change settings:

In System Properties, click Change:

Enter the Computer Name and Domain, then click OK:

Enter the domain admin username and password that you created previously, then click OK:

A success dialogue should appear:

The workstation is now a part of the domain, and basic configuration is complete.
Whether you set up the x64 version or the 32-bit version of Windows 7 first, the process is exactly the same for the other. If you want both versions in your lab, simply follow the process a second time with the alternate version of the OS.
Extra Credit
- Install all available Windows updates
- Adjust timezone
- Install antivirus
- Install a browser other than Internet Explorer
- Take a snapshot
Now the lab looks like this:

Go here to see how the Windows 8.1 workstation was created, or here to move on and create the CentOS workstation.
