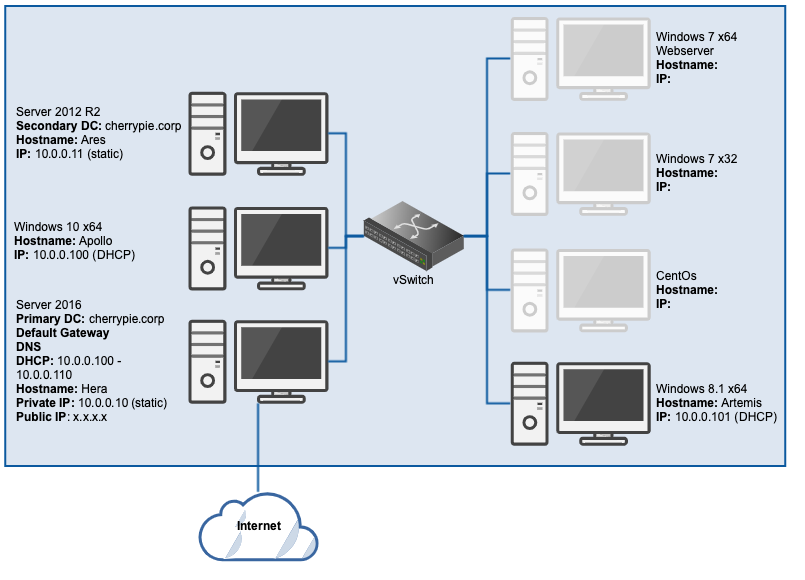
By this point, part 4 of the series, our lab looks something like this:

In this instalment, it’s time to add the Windows 8.1 workstation to the environment. The issue with this ISO, when compared to all the others, is that Windows 8.1 doesn’t allow the OS to be installed without a licence key. As a result, some finagling is required (read: an extra step to get the ISO ready before attempting to install the OS).
These steps will mirror those featured in this post for the most part. Read further on for the few additional steps required to get this lab machine up and running.
Create the ISO
Once you have all of the Windows 8.1 ISO and the virtio drivers downloaded (and installed where necessary), the following steps are required to create an ISO which will allow the OS to install successfully. The below assumes you’ve saved the necessary components to a folder called
Extract the contents of the Windows 8.1 ISO you downloaded to \customiso\Windows
Extract the contents of the virtio ISO you downloaded to \customiso\Windows\virtio
In the \customiso\sources folder, create a text file called ei.cfg. Add the following contents to the file, then save and close it:
[Edition ID]
Professional
[Channel]
Retail
[VL]
0
NB: make sure you save the file as a .cfg and not a .txt by accident.
Open ImgBurn.
Click Create image file from files/folders:

Add your customiso folder as the Source:

Add your output file path and filename:

Set the options tab (on the right) as below:

Set the labels tab as below:

Set the Advanced/Bootable Disc tab as below (Boot Image should be in the folder \customiso\boot\etfsboot):

All other settings can be left as default. Click Build:

Once the ImgBurn process completes you’ll have your very own custom Windows 8.1 ISO, complete with virtio drivers and the ability to install without requiring a licence key.
This isn’t to say that there will never be a requirement for a legitimate licence key; the OS will install as a trial version which will eventually expire, the same as any other Windows OS with no key provided.
Once the ISO is uploaded to the cloud provider, you can proceed to create your custom VM.
Workstation Configuration
During the OS installation, some of the settings which are usually reserved for configuration after the user reaches the desktop are included in the initial installation wizard. One such setting is the Computer Name (similar to Windows 7):

As you can see, I chose Artemis for this workstation. I also, in this case, used the Express Settings (something I wouldn’t ordinarily do):

With the OS installed, this VM should be automatically assigned an IP, probably 10.0.0.101 (the next available in the DHCP scope). Check this in the private NIC details via the Network and Sharing Centre:


Now we just need to connect the workstation to the domain, update it, and it will be ready for testing.
Domain Configuration
Right-click the Start Menu, then click System:

In the resulting window, click Change settings:

In System Properties, click Change:

Enter the Computer Name and Domain, then click OK:

Enter the domain admin username and password that you created previously, then click OK:

A success dialogue should appear:

The workstation is now a part of the domain. Sorted.
Extra Credit
- Install all available Windows updates
- Adjust timezone
- Install antivirus
- Install a browser other than Internet Explorer
- Take a snapshot
Our lab should now resemble this:

Go here to see how the Windows 10 workstation was created, or here to move on and create the Windows 7 workstations.
